DieselPunk Cellphone - Walnut Case, Powered by Adafruit Feather Fona: Build, Part Three
Getting close! A few things before final soldering of the Feather Fona on the perma proto:
Soldering for the perma proto
Your perma proto board should look something like this photo (only without the header pins):

Soldering for Feather Fona
If you want to use the FM radio option, you need to solder an antenna on the bottom of the Feather Fona. This can be as simple as a piece of 22AWG solid, a little over 3 feet long.

Tin the pad with solder first, as well as the stripped wire end of the antenna. After soldering, carefully bend the wire to fit into the sides of the top of the DieselPunk Cellphone case. You just want to prepare coiling them up, at this point. Take care not to pull on the solder joint for the antenna.
Apparently, I'm the "Angel of Death" for small-guage stranded wires. I broke the wires off the speaker itself twice and once off a Feather Fona's speaker connections. After that experience, I didn't want to mess with these tiny wires. I desoldered the supplied wires from an unused speaker, adding 26AWG solid wire. Place the FF on the perma proto and measure out about how long you need to mount the speaker behind the speaker bezel. Solder the speaker +/- connections by feeding the wire through the top holes, applying solder on the bottom of the FF.
Measure out some lengths of black/red (GND/+V) 26 AWG solid, enough to let the microphone reach the mic bezel and be soldered through the top of the Feather Fona holes, like the speaker. Give yourself some slack for positioning the mic. Strip & tin the mic leads and solder-splice them onto the 26AWG leads. It's a good idea to add heat-shrink to the joint for insulation and strain relief. Solder the mic onto the Feather Fona.
Remember that (red) 22AWG solid wire you soldered into the 3V pad, in an earlier step? Now, measure and strip/cut the wire so it can be soldered into the pp +V rail, underneath where the Feather Fona will seat passing the wire through the top of the perma proto and soldering on the bottom. Once more, make sure the Feather Fona is aligned properly on the perma proto board - USB pin at pp pin 5, FF pin 2 at pp 14. Check to make sure the red wire is in the +V rail (Why does he keep saying stuff like that?). Things going wrong are hard to fix after this point. Solder the 3V lead in place.
At this point, you can press-fit the FM antenna around the sides of the case.
- Solder keypad jumper wires
- Add an FM antenna
- Solder speaker and microphone
Soldering for the perma proto
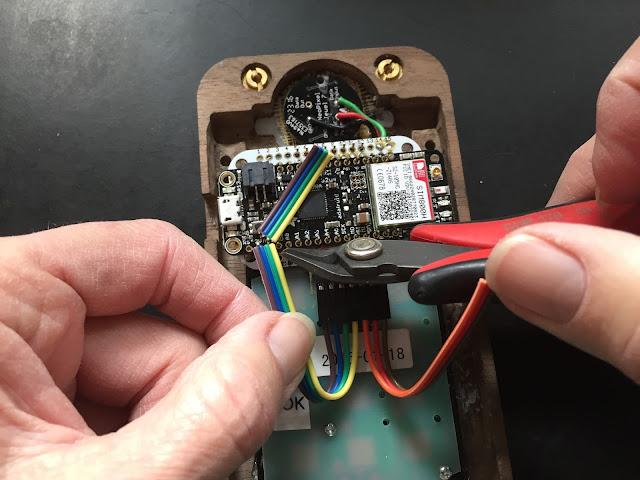
Measure and cut the jumper wires to attach the keyboard to the perma proto. Solder these on through the top of the perma proto, on the bottom row of soldering holes. Keep them as flat as you can.

Your perma proto board should look something like this photo (only without the header pins):

If you want to use the FM radio option, you need to solder an antenna on the bottom of the Feather Fona. This can be as simple as a piece of 22AWG solid, a little over 3 feet long.

Tin the pad with solder first, as well as the stripped wire end of the antenna. After soldering, carefully bend the wire to fit into the sides of the top of the DieselPunk Cellphone case. You just want to prepare coiling them up, at this point. Take care not to pull on the solder joint for the antenna.
Apparently, I'm the "Angel of Death" for small-guage stranded wires. I broke the wires off the speaker itself twice and once off a Feather Fona's speaker connections. After that experience, I didn't want to mess with these tiny wires. I desoldered the supplied wires from an unused speaker, adding 26AWG solid wire. Place the FF on the perma proto and measure out about how long you need to mount the speaker behind the speaker bezel. Solder the speaker +/- connections by feeding the wire through the top holes, applying solder on the bottom of the FF.
Measure out some lengths of black/red (GND/+V) 26 AWG solid, enough to let the microphone reach the mic bezel and be soldered through the top of the Feather Fona holes, like the speaker. Give yourself some slack for positioning the mic. Strip & tin the mic leads and solder-splice them onto the 26AWG leads. It's a good idea to add heat-shrink to the joint for insulation and strain relief. Solder the mic onto the Feather Fona.
Remember that (red) 22AWG solid wire you soldered into the 3V pad, in an earlier step? Now, measure and strip/cut the wire so it can be soldered into the pp +V rail, underneath where the Feather Fona will seat passing the wire through the top of the perma proto and soldering on the bottom. Once more, make sure the Feather Fona is aligned properly on the perma proto board - USB pin at pp pin 5, FF pin 2 at pp 14. Check to make sure the red wire is in the +V rail (Why does he keep saying stuff like that?). Things going wrong are hard to fix after this point. Solder the 3V lead in place.
At this point, you can press-fit the FM antenna around the sides of the case.

What an article. Thanks for sharing.
ReplyDelete