ESP8266 Weather Display

The ESP8266 (AKA Wi07C) is a cheap (<$10), tiny WiFi module that can be hooked up to any micro-controller that can feed it Serial (UART) commands. You can use this module to send data to or receive data from web sites. This puppy is cheap, but capable!

ESP8266 WiFi Module
Currently (as of Nov 15, 2014), there are at least 3 versions of the ESP8266 being sold. The hardware wiki at ESP8266-Wiki has details. I got mine from adafruit. Why? Adafruit offers a curated collection of products. They're either superior products designed by ladyada herself, or vetted outside products that are the current best available. So, I knew I was getting latest model of the ESP8266 which allows modifying the baud rate. When I got my modules from adafruit, the packing bag was labelled "fw 0.9.2.2". Good to know.
When I googled for what other people had done with the WiFi module, I came across the weather display at zeflo.com. My wife and I are weather freaks. Even though we live in the San Francisco East Bay, where we enjoy a moderate Mediterranean climate, we always check to see what the day has in store. I had some familiarity with wunderground.com weather feeds from a previous project, so this was a good place to start with the WiFi module. I also got some very good tips from Ian Sexton at this site.
Bill of Materials:
- ESP8266, available on ebay and others. Got mine at adafruit, $8.95 +Ship
- Arduino Uno/Leonardo or clone, or adafruit's Pro Trinket 3V version, $9.95+Ship
- Update 01-07-2015: See Pro Trinket Notes below for special configuration
- Breadboard
- LM317 Voltage Regulator TO-220 package or similar, Mouser has them for $0.80
- R1: 1x200 Ohm Resistor
- R2: 1x330 Ohm Resistor
- 0.1uF capacitor
- 1uF capacitor
- TTL Level Shifter (5V to 3.3V logic) if you need it - adafruit has 'em for $1.50
- M to F jumper wires for connecting the ESP8266 to a breadboard and Arduino
- M to M jumper wires for connecting components on the breadboard/Arduino
- Power supply - should be at least 500mA/5V; I used a 5V/2A I had in inventory
- Display - I used a 4 line x 20 character LCD, with Serial input from a ModernDevices LM117 Serial LCD Backpack, but any SPI/I2C graphical or serial display device will do, provided you have enough RAM
Difficulty:
Easy, although not a beginner project. It's just hooking up a few components and wires, plus installing software and configuring. If you follow the instructions here closely, you should be OK.
Stability:
At present, the WiFi connection needs to be reset periodically. I used the kludge of doing a "hard reset" of the ESP8266 in code to keep it going (courtesy of Ian Sexton).
Hardware Build:
The ESP8266 is a 3.3V module. If you're used to using a 5V Arduino, you'll have to make some adjustments.
If you are using a straight-up Arduino or clone, you'll need a TTL logic level shifter to get the 5V out from the Arduino down to 3.3V that the ESP8266 wants, or risk frying the WiFi module. If you use a Pro Trinket 3.3V model, you won't have to worry about that - it uses 3.3V logic.
Ladyada pointed out the ESP8266 can have spikes of 300mA or more current, much more than can be supplied directly by the Arduino. Youll want to use an external voltage regulator that can handle more at least that much current. That's why I'm using the LM317.

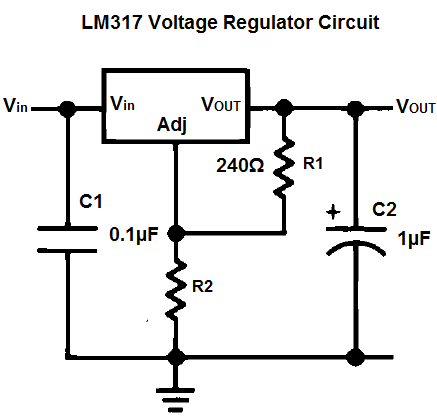
I used R1=200/R2=330 Ohms, with 3.15V out - within workable range
 RED (2 CONNECTIONS)= 3.3V/BLK=GND; Connect LM317 GND to Arduino GND
Software Build:
- You need at least the Arduino IDE version 1.0.6 which can support the nested folders used in the ArduinoJson library used in this project. Download Arduino 1.0.6 HERE
- Download the ArduinoJson library from ArduinoJson library from github. How to install library instructions HERE
- Depending on your display, you may need to download one or more libraries (such as SSD1306, ST7735, etc. - plus GFX library). I used the LM117 serial backpack which does not need its own library, but uses its own command set.
- Download the Arduino sketch HERE
- You need an API License Key for wunderground (free), available HERE
Software Configuration:
In the Arduino sketch, there are two variables to update to get to your network:
#define "" // insert your network SSID
#define "" // insert your WPA2 password
#define "
#define "
Once you have your free API key for wunderground, you can update the sketch at line:
cmd = "GET /api/YOURKEY/conditions/q/";There is also a location variable you must modify:
#define LOCATIONID "
OR
#define LOCATIONID "
For International locations, substitute the full English country name/city for the LOCATIONID,
for examaple:
#define LOCATIONID "Germany/Munich"
If found it convenient to check the returned values from the sketch by entering the api line directly into a browser address:
http://api.wunderground.com/api/YOURKEY/conditions/q/94523.json
Here are sample API calls for International locations.
http://api.wunderground.com/api/YOURKEY/conditions/q/Australia/Sydney.json
http://api.wunderground.com/api/YOURKEY/conditions/q/Germany/Munich.json
You can also get both current conditions and forecast on a single call:
http://api.wunderground.com/api/YOURKEY/conditions/forecast/q/Australia/Sydney.json
However, you would have to change the Arduino sketch to add forecast:
from:
cmd = "GET /api/YOURKEY/conditions/q/";to:
cmd = "GET /api/YOURKEY/conditions/forecast/q/";
How it Works:
WiFi Connection
You communicate with the ESP8266 via old-school AT commands:
- Hard Reset
- Connect to WiFi
- Set to single connection
- Set up TCP connection
- Send data (GET) to wunderground
- Use Serial to read the returned json (JavaScript Object Notation) pairs
- Parse the key-value pairs
- Display
- Wait 15 minutes
Serial Reads and Processing
When data returns from the API call, we need to read through the returned key-value pairs (fieldname:value) for the data we want. This is a VERY large returned json set, on the order of 1500 characters or larger. Here's a sample of what the data looks like:
"city":"Pleasant Hill",
There's an array in the sketch. conds[], that stores the conditions we want to return to the Serial read. A priming Serial.find is used to find each entry stored in conds. The data after that find operation will be the other half of the key-value pair, delimited by a comma. The read routine breaks at the comma: the comma will be added after each entry except the last.
The entries in conds[] look very strange: char* conds[]={"\"city\":","\"weather\":" ... That's because we are including the quote marks (") in the data and we have to tell the sketch, yeah, we want to include this quote mark in the data.
The entries in conds[] look very strange: char* conds[]={"\"city\":","\"weather\":" ... That's because we are including the quote marks (") in the data and we have to tell the sketch, yeah, we want to include this quote mark in the data.
Both the conds key and its associated value are stored in an array (json), with commas and quotes embedded in the string. At the end of the data, a closing curly brace (}) is concatenated to json. We just created a string in a format the ArduinoJson parser can use.
Finally, we parse the json objects and format them for printing.
Notes and Cautions:
- Keep the ArduinoJson parse in a function. Otherwise, the parsing buffer will fill up and won't work. See the ArduinoJson Wiki HERE for details
- You can change the entries in conds[], but beware of embedded commas in the data. Remember commas are used as delimiters. Check what the returned data looks like by using a direct API call from a browser
- Names can be repeated in the returned json data (eg: "full" is used at least twice). This will affect your Serial.find
- Make sure you are retrieving data in the order that it is presented from the API. It's NOT alphabetic order.
- I couldn't seem to process more than 7 entries, things would break around the json parse step. This could be that I made a programming mistake, or that I wasn't handling the returned data properly.
- Be careful how many calls you make to the wunderground API with your free account. For the free license you are limited to no more than 10 calls per minute and no more than 500 calls per day. The sketch for this project has a delay(900000) at the end of the loop, which results in a call about every 15 minutes. 4 calls per hour * 24 hours = 96 calls per day, well within the restrictions.
- If you make changes, watch out for memory leaks. In the stock sketch in github, I had a little over 500 bytes (of 2048) free. Take care if you use a display or library that requires a large buffer in program memory
Pro Trinket Notes Updated 01-07-2015
The Pro Trinket 3V runs at 12Mhz. SoftwareSerial (required for this project) through Arduino 1.0.6 only has a version of SoftwareSerial that supports 8, 16 and 20MHz. You will need to update the SoftwareSerial.cpp file, available on git HERE.
Instructions for updating SoftwareSerial.cpp on a Mac:

- Close Arduino if running
- Open a New Finder Window
- Open Applications, highlight Arduino (or whatever you name your Arduino app)
- Show Package Contents
- Open Resources\Java\libraries\SoftwareSerial
- Copy SoftwareSerial.cpp (downloaded from github) to this folder, replacing the older version of SoftwareSerial.cpp
- Restart Arduino
New sketch added to github to use the Adafruit Feather Huzzah. The code is based on Mike Rankin's ESP8266 OLED Weather Display and uses Web Client calls from the ESP8266WiFi library. The original sketch code described in this blog post used AT Commands to communicate with the ESP8266 module.
If you use a 5V 4x20 LCD as in this post, you will still have to use a separate 5V power supply for the LCD and feed 3V to the Huzzah from a voltage regulator, described above. My guess is the Huzzah does not have enough current to power the backlight on typical LCD panels.

Thanks for showing on Adafruit's Show and Tell! I've been looking for a way to parse JSON data on an Arduino. Nice work!
ReplyDeleteGlad I could be of some help, thanks for the comment!
ReplyDeleteJust wanted to say thanks for posting the details of the project! I'm modifying your code to create a custom design using the 32U4 because of the extra serial port and a 128x64 oled display. Just got the weather info displayed on my pc and hope to throw it to the little display soon. Couldn't have done it without your page. I'd attach a picture but it's not possible here.
ReplyDeleteMike
That makes me happy, Mike! I've gotten so much from the Maker community, I really like it when I can give back.
DeleteDon't know which OLED display you're using. If you use the 128x64 0.96" one from adafruit with the adafruit SSD1306 library, be careful of your RAM use. The product description for that one says:" It uses 1K of RAM since it needs to buffer the entire display". I was down to 508 bytes free on my sketch out of 2KB. The 32U4 has 2.5KB, so you might just make it...
One trick to save memory is to use the F macro when printing static strings to save RAM, for example: Serial.println(F("This string will be stored in flash memory"));
You were correct about the Adafruit library, it required too much memory so I used an i2c type instead that needs no library. Made a quick video last night: http://youtu.be/41y8X9wo6GE that is pretty rough. I'll add the reset line from the micro to the ESP and cannot figure out how to display the double temp and windspeed values onto the oled. Thanks again
DeleteHave you considered using a non-json format that is more easily parseable like I did here: http://2xod.com/articles/Arduino_Wifi_USR_232-T_OLED_Word_of_the_Day/
ReplyDeleteWhat's the format for 'locationid' ? I tried 'NY/Queens' and 'Queens'
ReplyDeleteI'm getting connected to my wi-fi fine. I'm getting 'connection timeout'. in the debug I send the send.
I'm guessing "Queens" is a special case for wunderground as it's a borough, not a city by itself. I tried:
Deletehttp://api.wunderground.com/api/MYAPICODE/conditions/q/queens_ny.json
That returned:
"display_location": {
"full":"Queens, NY",
"city":"Queens",
"state":"NY",
and further down:
"observation_location": {
"full":"Just West of Town Hall, Floral Park, New York",
"city":"Just West of Town Hall, Floral Park",
You can also put in the exact US 5-digit zip code for the area you are interested in, like this for Floral Park:
http://api.wunderground.com/api/MYAPICODE/conditions/q/11004.json
So are you saying I can repace:
ReplyDeletecmd = "GET /api//conditions/q/";
with something like:
http://api.wunderground.com/api/MYAPICODE/conditions/q/11004.json
also, thank you Sir for your response.
Sorry, I wasn't being clear. The http://... in my previous reply was just putting the URL into a browser to show what comes back from wunderground.
DeleteIf you look at the README in the github, you'll see:
LOCATIONID can be of the following forms:
#define LOCATIONID "Germany/Munich" (International)
#define LOCATIONID "94523" (US ZipCode)
#define LOCATIONID "CA/Pleasant_Hill" (US City)
In the Arduino sketch, you just change the define to read:
#define LOCATIONID "11004"
Don't change the cmd string, it will pick up the zipcode from LOCATIONID
Hope that helps
thanks for the great work got my one going on serial at the min but will move to oled later
ReplyDeletejust having probs with the place im trying to get temp for it works for a place about 10 min away but not for where i want it
but they both look the same in a webpage
Depending on how many wunderground Personal Weather Stations there are in your area, you may be able to change to a particular one closer to you. You can find the list of Personal Weather Stations from wunderground.com by entering your zip code or city and scrolling down to the returned page to see a list title Nearby Weather Stations. When I do this, I see a list of locations nearby. When I hover my cursor over a location in this list, I see a URL with an ID=XXXXXXXXX at the end of it.
DeleteSee my response to Stuart Riggs above - try changing LOCATIONID value to "pws:XXXXXXXXX" where the XXXX's are replaced by the Personal Weather Station number, just the part after the "ID=" in the URL.
thanks for the reply
ReplyDeletealso do you think it would be easy to change the screen to oled i have one here a i2c
My next design will use an i2c oled. I have sample code already using the i2c oled that needs no driver to reduce code space. Some drivers fancy with graphics can take up plenty of memory.
DeleteYes, see the thread above between Mike Rankin and me. The gotcha is an OLED that needs a library. That library may use too much RAM on the Arduino. Mike got around it by using an OLED that doesn't require a library. However, I don't know what kind Mike is using.
ReplyDeleteIt's a big mess right now but the i2c code may be of some help. My display is hardwired to address 0x3C. I'll go through and clean it up when my new PCB revision comes in.
Deletehttp://pastebin.com/awwbtpUC -code
http://pastebin.com/2cJC1Hr3 -font
I dont have a LCD panel so can you tell me what I would have to change to display data to Serial instead?
ReplyDeleteThe LCD uses SoftwareSerial, which has print statements very similar to standard Serial communications. You control the ESP8266 from the one hardware Serial port on that board.
DeleteI'm not sure what you want to do, but perhaps SoftwareSerial would work?
Download the sketch and take a look at it.
Great work thanks
ReplyDeleteYou don't ahppen to have a version using an ethernet shield?
I am trying to get it working but so far no joy, wunderground does not seem to recognise my request.
It works via the browser as you suggest, but nothing when entered into the Arduino URL
Regards
John
Sorry, I only tried this on the ESP8266..
DeleteThis is a great project and I am obtaining the necessary parts and WeatherUnderground API to construct what will be my first real Arduino project. So this may sound naive, but can you describe the wiring interconnection between the components? I am primarily interested in what GPIO pins are used to communicate between the Arduino and the wifi module, and also how the voltage regulator is inserted/
ReplyDeleteThanks for any help you can provide. -Artie
Hi Artie-
DeleteWith you saying "...will be my first real Arduino project" I'm guessing that you are a beginner. Note that I said in the post: "Easy, although not a beginner project." You likely need to get some of the basics under your belt before attempting this one, like trying blink and Serial example sketches.
I have disassembled this project, so I can't offer much more help than is in the blog post. To help you, I'd have to reconstruct the project and I don't have time for that.
I'll give you some homework, which I hope will be helpful. Sparkfun has an excellent post on How to Read a Schematic:
https://learn.sparkfun.com/tutorials/how-to-read-a-schematic. This has a lot of information in it, but you may only need to concentrate on Resistors, Capacitors, Voltage and Ground, and Connections to get started. This will help you understand the schematics shown in the post.
Also, the actual sketch code can give you hints on what things are being connected. For example, #define ESP_RST 4 tells you that pin 4 of the Arduino is connected to the RST pin of the ESP8266. Look at the other "number' references and things like "pinmode" to see what's going on. Other clues are in the Serial statements: Serial.print(cmd) is going out the TX pin of the Arduino to the RX pin of the ESP8266; Serial.read is coming BACK from the TX pin of the ESP8266 to the RX of the Arduino.
Other than these starter tips, I can't offer more aid.
Hope this helps!
thisoldgeek:
ReplyDeleteThank you for responding. And, yes I am pretty new to digital circuits and microprocessors, but have decent knowledge of traditional circuits, etc. Your last paragraph is particularly helpful - it is the pin connections that I was struggling to understand. I will start-in on my homework. Thanks again, Artie
Great work and thanks>>>
ReplyDeleteI actually I am using (ESP8266_Weather_Feather_Huzzah.ino) the Sketck you attached.
The first error is the ESP8266wifi.h library not match with ESP8266WiFi.h one you attached, because there is capital letters and small letters different. and in same time i trying to change it but got other error.
so please help me >>>
thanks
This is a library problem. My tutorial is old now, things change. Try this: Remove the ESP8266 library if installed in Arduino/sketchbook/libraries. Start Arduino and from the Arduino menu choose Sketch/Include Libraries/Manage Libraries. Search in the screen that comes up for ESP8266. There should be an entry for ESP8266 Built-in showing installed. This worked for me in Arduino 1.6.7 - I was able to compile for the Adafruit Huzzah Feather board. You may also have to update the arduino-JSON library.
DeleteHello,
ReplyDeleteLCD is attached to d2 and d3 but how do you connect arduino to esp6288?
Thank you
The sketch is for arduino or for esp8266?
ReplyDeleteThis project is over 4 years old, and is now broken. Wunderground stopped support for their free weather API in 2019.
ReplyDeleteThe last update for this project has code in github that runs on an Adafruit Feather Huzzah, an Arduino work-alike that has an on-board ESP8266.
There are other free weather API’s available, such as Open Weather Map.
However, I don’t have time to update this project or offer support.