Garage Door Monitor
 |
| Check your garage door from the office, kitchen... or anywhere! |
Story
There are lots of garage door monitor projects on hackster.io and other Maker sites. Many are single-purpose solutions. I wanted a project that would be extensible, to build on the skills learned for future IOT projects. In fact, I already had a project in mind, a general notification platform called the Kinetic Courier. That project could include a garage door monitor as an example notification trigger.
Also, I wanted a platform that was well-documented and well-supported. Adafruit's cloud service for Makers, adafruit.io, fit the requirements. In addition, I was motivated by personal need. My nice neighbors had, once too often, called late at night to remind me the garage door was open ;-)
This is largely inspired by and based on the Adafruit IFTTT Door Detector project by Todd Treece for Adafruit, and other work as mentioned on reddit , with a few code tweaks and add-ons.
Where my project is different:
GarageDoorMon doesn't use a battery, it's powered by a 5V adapter; you'll need a long wire from the door and place the Feather Huzzah near a mains power source
Logic is reversed, a '1' is sent to adafruit.io when the garage door is open, '0' when closed(SHUT)
Added: raspberry pi zero W runs a system service to monitor the door status, shows on 4-digit display
IFTTT is not required! Of course, you can use it if you like, in addition or instead.
The pi zero W uses MQTT subscribe directly from adafruit.io feed, via python cllient code.
This is largely inspired by and based on the Adafruit IFTTT Door Detector project by Todd Treece for Adafruit, and other work as mentioned on reddit , with a few code tweaks and add-ons.
Where my project is different:
Overview
An Adafruit Feather Huzzah checks whether the garage door is open/shut via a magnetic switch, then sends the current status to an adafruit.io feed. Inside the house, a Raspberry Pi Zero W with a 4 digit alpha display subscribes to the feed via MQTT and displays the current status. You can also get a notification on your phone from IFTTT.
An Adafruit Feather Huzzah checks whether the garage door is open/shut via a magnetic switch, then sends the current status to an adafruit.io feed. Inside the house, a Raspberry Pi Zero W with a 4 digit alpha display subscribes to the feed via MQTT and displays the current status. You can also get a notification on your phone from IFTTT.
Cost
There are two versions:
Option 1:
About $20 USD, build an Adafruit Huzzah status checker and send Notifications to your phone with IFTTT (free, sign-up required)
Option 2:
About $40 USD (includes Option 1 cost), build Option 1, and add an LED status display with a Raspberry Pi Zero W
There are two versions:
Option 1:
About $20 USD, build an Adafruit Huzzah status checker and send Notifications to your phone with IFTTT (free, sign-up required)
Option 2:
About $40 USD (includes Option 1 cost), build Option 1, and add an LED status display with a Raspberry Pi Zero W
Difficulty
Easy. About 2-3 hours, depending on Options.
Parts
- Adafruit Feather Huzzah, $16.95 USD
- Adafruit Magnetic Contact Switch, $3.95 USD
- Misc wire, > 15m
- Raspberry Pi Zero WH, $14.00 USD
- Adafruit Quad Alphanumeric Display (Red), $9.95
- Misc female-to-male jumper wires
- 5V USB Power Adapter
- Micro-USB to USB-A Cable
Process
- sign up for an adafruit.io account, if you don't have one; create a feed for the garage door
- download the GarageDoorMonitor.ino from github
- solder up the Huzzah and personalize/upload the sketch GarageDoorMonitor.ino
- wire up your garage door with a magnetic switch and test that the feed is working
- set up IFTTT to monitor the feed
- download latest Raspbian and install on pi zero W
- on the pi zero W, git clone GarageDoorMon and install other software (especially Adafruit Python LED Backpack)
Build It!
Option 1
Use the Adafruit article at Using IFTTT with Adafruit.IO to Make an IOT Door Detector up through the Adafruit IO Setup section. Via links, this will walk you through signing up for adafruit.io and getting the project going. Create a feed called GarageDoor.
Use the Adafruit article at Using IFTTT with Adafruit.IO to Make an IOT Door Detector up through the Adafruit IO Setup section. Via links, this will walk you through signing up for adafruit.io and getting the project going. Create a feed called GarageDoor.
 |
| Huzzah with External Resistor Network attached |
 |
| Magnetic Switch Sensor installed on Garage Rails |
The Adafruit project is mounted on an interior door frame and is battery powered. Mine has the sensor on the garage door frame with long wires from the switch to position the Huzzah near a 5V wall power source. Mount the sensor on the garage door when the door is open, with the sensor aligned to its magnet.
How this works!
The magnetic switch/sensor is NO ("Normally Open") when away from the magnet. When the magnet is close enough, the switch will be "closed". The Adafruit Door Detector post expects an open door to be a rare event. The Adafruit Arduino code does no notification whatsoever if the door is closed!
Adafruit's Code
The following talks about how the code works as written in the article. My code is different, and it reverses the logic so LOW (connect to GND/closed switch) is sent to the Huzzah pin for an open door!
How does the Huzzah detect an open or closed door? Magic!
Well, the magic of resistance. The magnetic switch is wired to GND and a pin that is "pulled up" by a significant resistance (10K Ohm) to a +V. If the switch is closed (in the presence of a magnet), there's little to NO resistance on the GND side, but high resistance on the pin side. Using the path of least resistance, this registers as a "LOW" condition and no notification.
But! If the door opens, and the sensor is pulled away from the magnet, the resistance on the GND side can be thought of as virtually "infinite". Since the resistance on the pin side (tied to +V) is something, but less than infinite, this registers as a "HIGH" condition. The code for door_open (and only door_open) runs and a feed to adafruit.io takes place.
See the great Adafruit tutorial on pullup/down resistors for more info.
There was a problem on my build - kept getting floating values even though a pullup resistor was set in code. I used an external pullup resistor network of 10K Ohm and 100 Ohm resistors on a protoboard - fixed that!
See the great Adafruit tutorial on pullup/down resistors for more info.
 |
| External pullup resistor wiring, image: Adafruit |
There was a problem on my build - kept getting floating values even though a pullup resistor was set in code. I used an external pullup resistor network of 10K Ohm and 100 Ohm resistors on a protoboard - fixed that!
The Adafruit code also uses a little trick to run periodically. All of the functional code is in the void setup routine - the main loop has no code! With wiring to the RST pin on the Huzzah, the setup routine resets based on the value (in seconds) of a SLEEP_LENGTH variable (3 seconds default). The setup routine runs each time reset is run - no need for loop code!
My Code - differences from Adafruit
This Garage Monitor:
- runs from wall power instead of battery - no battery charge checking code as in the Adafruit version
- runs continuously from void loop, doesn't reset at timed intervals
- sends a new feed value when the "state" (either OPEN/SHUT) changes
You should monitor your feed rate if you have an Adafruit free account - capped at max 10 feeds, 30 feeds a minute. The feed rate is much lower when you only send a feed on state change.
Why did I change the door logic in the code? Simple - the switch would be closer to the power source when open, less wire was needed to hook it up.
Use the Arduino Code section from the article for set-up and loading the Huzzah, but load the Garage_Door_Monitor.ino sketch from github, with its required config.h file. Don't forget! Change the config.h file for your adafruit.io username and key and supply your wifi SSID and password.
Position the magnet and the sensor carefully on the garage door. You want the magnet and sensor to be aligned horizontally about 6mm apart when triggered. Place the sensor on a fixed part of the door, and the magnet on the moving door itself. Be careful that there are no obstructions when you operate the door that will dislodge the magnet. Set up your Huzzah per the instructions in the Adafruit article Wiring Section:
Pin 13 to one side of door sensor
GND to opposite side of door sensor
I soldered female jumper wires to the long wires. To connect to the Huzzah, use male-to-female jumpers - female to Huzzah, male to long wires. Test it by operating the door and monitoring your adafruit.io feeds from a web page
When the Huzzah and adafruit.io are working together, follow the instructions to set up IFTTT to adafruit.io. The Adafruit article sends an email message. The images below show how you can send a notification to your phone:


Use the Arduino Code section from the article for set-up and loading the Huzzah, but load the Garage_Door_Monitor.ino sketch from github, with its required config.h file. Don't forget! Change the config.h file for your adafruit.io username and key and supply your wifi SSID and password.
Position the magnet and the sensor carefully on the garage door. You want the magnet and sensor to be aligned horizontally about 6mm apart when triggered. Place the sensor on a fixed part of the door, and the magnet on the moving door itself. Be careful that there are no obstructions when you operate the door that will dislodge the magnet. Set up your Huzzah per the instructions in the Adafruit article Wiring Section:
When the Huzzah and adafruit.io are working together, follow the instructions to set up IFTTT to adafruit.io. The Adafruit article sends an email message. The images below show how you can send a notification to your phone:

IF Service
Choose "Any New Data" Trigger

Choose "GarageDoor" feed

Finalize by clicking "Create Trigger" button

Choose Notification Service

Choose "Send a notification from the IFTTT app"

And, click "Create Action".
Option 2
Step 1: Raspbian Stretch Lite
- Download Debian Stretch Lite
- Install to micro sd card. This is a good set of instructions.
- Two files need to be added to the /boot directory on the new sd image card.
On Windows, create an empty file called ssh and a file named wpa_supplicant.conf with the contents shown (second box) below
For Linux/Mac:
 sudo touch ssh
 sudo nano wpa_supplicant.conf
And for Windows/Linux/Mac, enter and save the following, changing ssid and psk to your router's ssid and password:
 ctrl_interface=DIR=/var/run/wpa_supplicant GROUP=netdev
 update_config=1
 country=US
 network={
 ssid="Your network SSID"
 psk="Your WPA/WPA2 security key"
 key_mgmt=WPA-PSK
 }
After getting Raspbian configured, run headless (no monitor/keyboard/mouse) - insert the SD card into your pi and power up. Allow a couple of minutes for the pi to fully start up. If you are running Windows, download the putty terminal emulator to connect to the pi with SSH. You should be able to find the IP address from your router's web page. And, to SSH in from a Mac/Linux terminal:
ssh "192.168.0.xxx" -l pi
Where "192.168.0.xxx" = your pi's IP address (without quotes). The default password is raspberry. Be sure to change it on first login. You should also configure other settings, via:
sudo raspi-config
- Network Options/Hostname (I named my host GarageMon)
- Localisation Options
- Advanced Options - Expand Filesystem
After completing the config, reboot. When you sign back in, update packages and set up git:
 sudo apt-get update
 sudo apt-get upgrade # This step takes a long time!
 sudo apt-get install git-core
 git clone http://github.com/thisoldgeek/GarageDoorMon
Cloning this github repository will create a new directory under /home/pi/GarageDoorMon. This GarageDoorMon directory contains all the assets needed for this project, including setup scripts and code.
Do:
sudo shutdown -h now
To prepare for Step 2.
Solder the 4-digit AlphaNumeric display per the instructions on Adafruit. Adafruit has a wiring diagram here.
While powered off, install the wires for the display:
- Connect display + (power) to Raspberry Pi 3.3V or 5V power (red wire). 5V is brighter but if you have other devices on the I2C bus its better to go with 3.3V
- Connect display - (ground) to Raspberry Pi ground (black wire).
- Connect display D (data/SDA) to Raspberry Pi SDA (orange wire).
- Connect display C (clock/SCL) to Raspberry Pi SCL (purple wire).
- If there's a Vi2c or IO pin, connect that to 3.3V as well
From a terminal connected to the raspberry pi zero W, run the following:
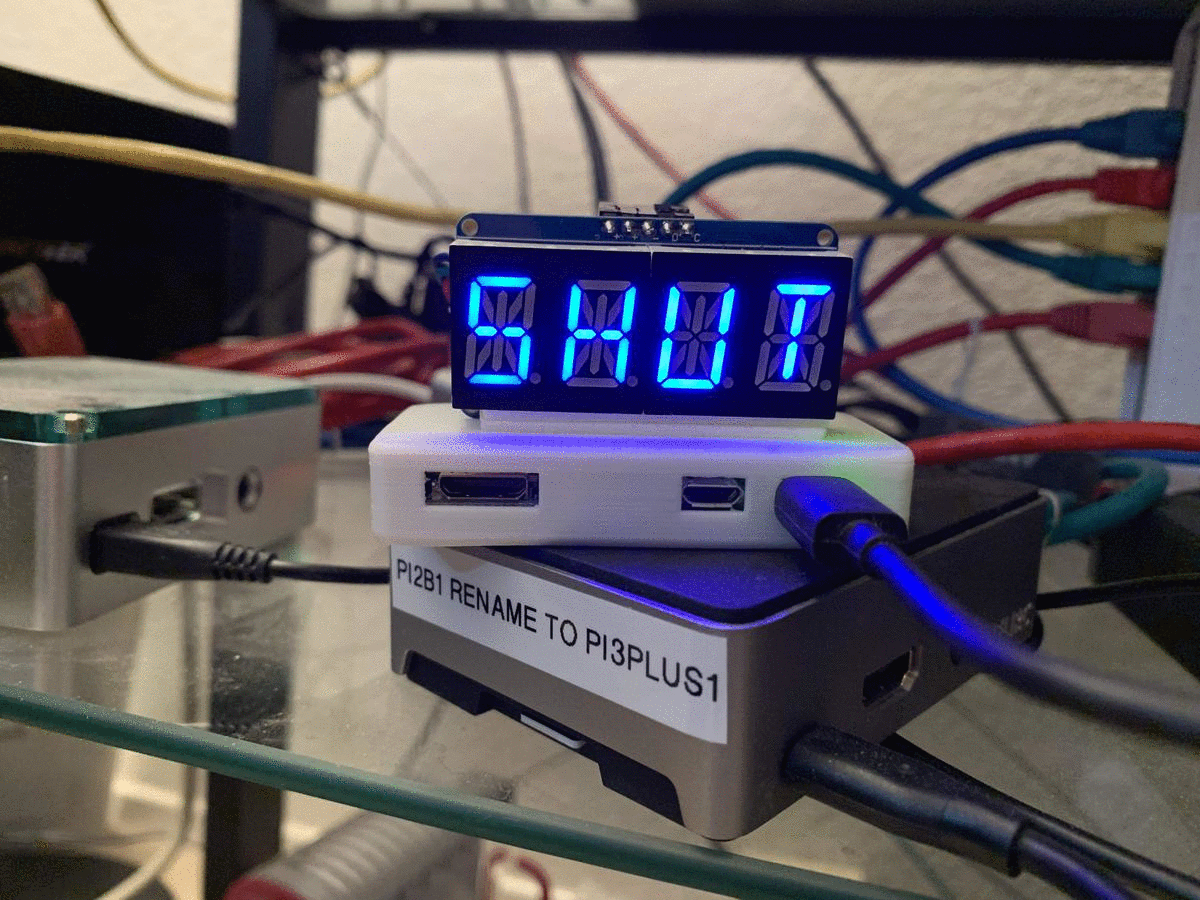
The display will initially show STRT until there is a change in the data feed. After that, with a slight delay, it should display the current state - SHUT/OPEN.

Comments
Post a Comment